I still remember how long I spent just trying to achieve a mirror-like surface—and how I learned that it’s not about polishing harder, but polishing smarter. Every step matters. Every mistake costs you time. This guide reflects what I’ve learned while preparing AA6082 aluminium for EBSD (Electron Backscatter Diffraction) analysis, using only manual tools and techniques.
In this case, we aimed to measure the grain size of Aluminium 6082, a step critical to understanding the material’s microstructure for further deformation or mechanical behavior studies. Initially, we planned to reveal the grain boundaries via chemical etching and analyze them under an optical microscope. However, despite several trials with different etchants and dwell times, the grains did not appear clearly enough for accurate evaluation. That’s when we turned to EBSD for a more reliable solution.
📐 Sample Geometry and Orientation
We prepared cubic samples, carefully cutting them to expose all three orthogonal directions:
- Longitudinal Direction (LD)
- Transverse Direction (TD)
- Normal Direction (ND)
Before polishing, we used a manual engraving pen to mark the back of each sample to maintain orientation tracking—especially useful for EBSD mapping.
🧰 Materials and Equipment Checklist
- Lab coat, gloves, safety goggles
- SiC sandpapers (400, 800, 1200, optionally 2500 or 4000 grit)
- Polishing cloths (specific to each polishing stage and alloy type)
- Diamond suspension or paste (6 µm, 1 µm, 0.25 µm)
- Colloidal silica suspension (OPS, 50 nm)
- Distilled water, ethanol
- Tweezers, beakers, ultrasonic bath
- Air duster or nitrogen gun (⚠️ never use lab compressed air)
- Hot or cold mounting resin
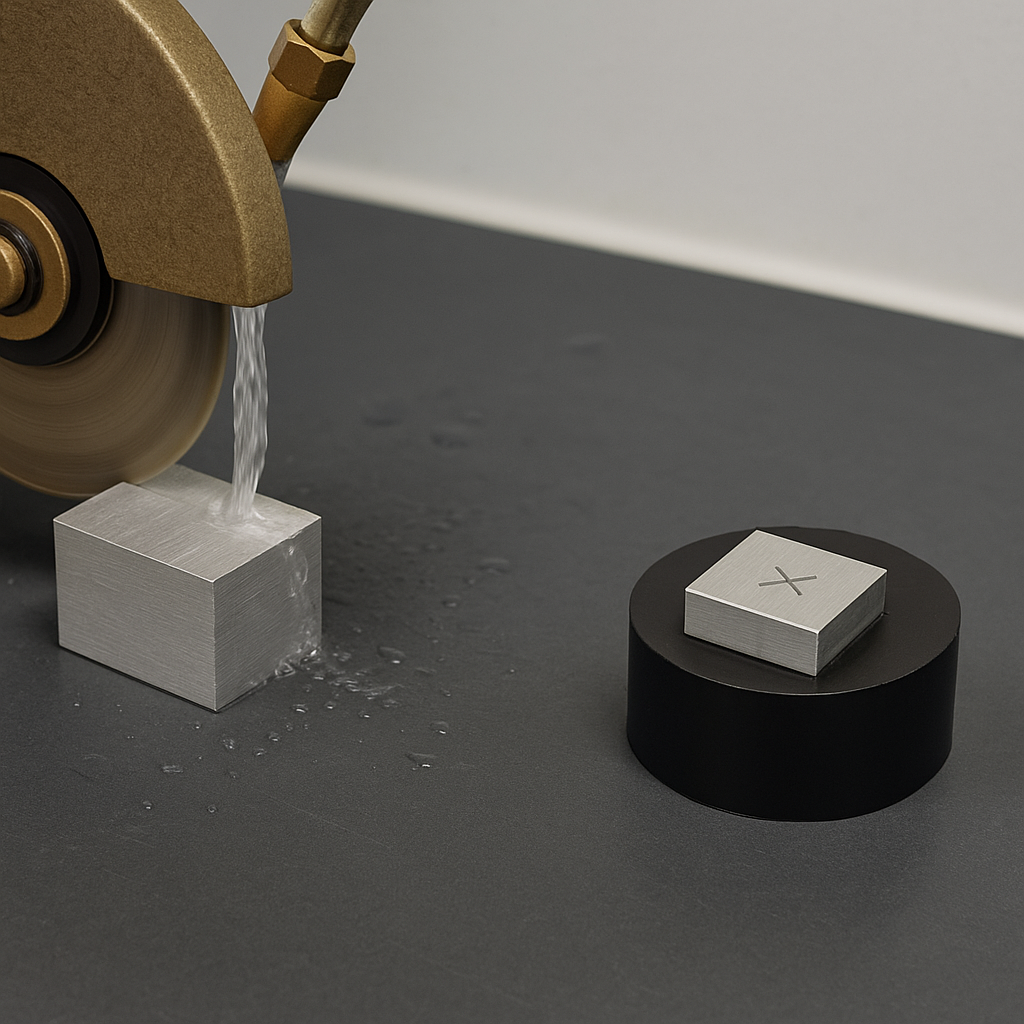
✂️ Step 1: Cutting the Sample
Cutting was done using a precision abrasive wheel at 2 mm/min, under water cooling to prevent overheating and microstructural damage.
Yes, it takes longer, but it’s essential to preserve the microstructure and minimize subsequent deformation.
🔲 Step 2: Mounting the Sample
We used cold or hot mounting depending on availability. Cold epoxy mounting is more common when temperature-sensitive phases exist.
💡 Tip: Always mark the back of your sample before polishing to maintain directional orientation for later EBSD analysis.
⚙️ Step 3: Manual Grinding (The Real Skill)
This guide focuses on manual preparation, not automatic polishing. That means you’re the machine.

Each grinding step is critical—especially when preparing for high-resolution EBSD scans.
Key Principles for Every Grit:
✅ Hold the sample firmly.
Do not rotate the sample during a single grinding stage. All scratches should run in the same direction. This makes it easier to identify and eliminate the previous layer’s deformation in the next stage.
✅ Use light, even pressure.
Too much pressure will embed abrasive particles into the surface—particularly a risk with soft metals like aluminium.
✅ Watch for full scratch removal.
Only move to the next grit once all prior scratches are gone. This ensures the deformation layer is completely removed.
✅ Between each grit stage:
- Rinse the sample thoroughly with clean water
- Dip in ethanol and dry with an air duster (or nitrogen gun)
- Visually inspect under bright lighting or an optical microscope for scratch pattern and uniformity
✅ Rotate 90° between each step.
This orthogonal scratch method allows you to easily confirm whether the previous layer has been fully removed.
🧠 A Critical Mindset: Slow is Smooth, Smooth is Fast
Grinding for EBSD isn’t like polishing for general imaging.
Here, subsurface damage must be minimized, and the deformation zone must be nearly eliminated before polishing even begins.
So don’t rush this step.
Your final polish is only as good as the surface you start with.
⏸️ Before We Continue: A Question Worth Asking
Now that we’ve manually prepared a near-perfect flat surface, we’re almost ready to start polishing with diamond suspensions.
But let’s pause here and ask:
❓ If you’re not using an automatic mounting press with levelling control…
How can you manually ensure both faces of your sample are parallel?
Because even the most beautiful polish won’t help if the sample is uneven—and EBSD mapping hates tilt.
✨ Step 4: Polishing — Transitioning from Grinding to Mirror Finish
After completing manual grinding, polishing is the next critical phase for preparing samples for EBSD. While grinding removes deformation layers with directional scratches, polishing aims to eliminate these scratches and produce a deformation-free surface with minimal relief.
🧲 Preparation: Setting Up the Polishing Station
Start by attaching the appropriate polishing cloths to the magnetic polishing plate. Each cloth is designed for a specific grain size and material type:
- Use harder cloths (e.g., TexMet or DP-DAC) for coarser diamond pastes like 6 μm or 3 μm.
- Use softer, napped cloths (e.g., DP-Mol or DP-Nap) for fine polishing with 1 μm and 0.25 μm suspensions.
⚠️ Never use the same polishing cloth for different alloys. For example, avoid using a cloth previously used on titanium for polishing aluminium. Harder particles from other alloys can embed in the cloth and scratch your new sample.
Also, beware of pull-out effects—especially in materials with large second-phase particles, such as AZ31 magnesium alloys. These can loosen during polishing and scratch subsequent samples if the cloth is reused.
💎 Step 5: Diamond Polishing
Start polishing with 6 μm diamond suspension, especially if your sample has visible grinding scratches. Follow these guidelines:
- Apply a few drops of diamond paste or suspension directly onto the cloth.
- Use a compatible lubricant (oil-based, water-based, or alcohol-based) to maintain slurry flow and reduce heat.
- Keep the polishing cloth spinning in one direction.
- Rotate your sample manually in the opposite direction to avoid directional artefacts.
✅ Unlike grinding, you should rotate the sample during polishing. However, always apply light pressure to avoid embedding particles or introducing new scratches.
✅ The goal here is to eliminate all directional grinding scratches. A well-polished surface will show random, non-directional fine scratches that are barely visible.
✅ Once the sample is polished with 6 μm, clean it thoroughly before moving to the next step. We recommend placing the sample in an ultrasonic bath with ethanol for 10–15 minutes.
💡 This prevents carry-over of abrasive debris to finer stages—critical for achieving high-quality EBSD surfaces.

🧪 Final Stages of Diamond Polishing: 1 μm and 0.25 μm Diamond Polishing
Repeat the same polishing process with 1 μm and finally 0.25 μm diamond suspensions:
- Use a fresh, dedicated polishing cloth for each alloy.
- Continue applying lubricant and control the rotation gently.
- At each step, clean the sample ultrasonically and inspect the surface.
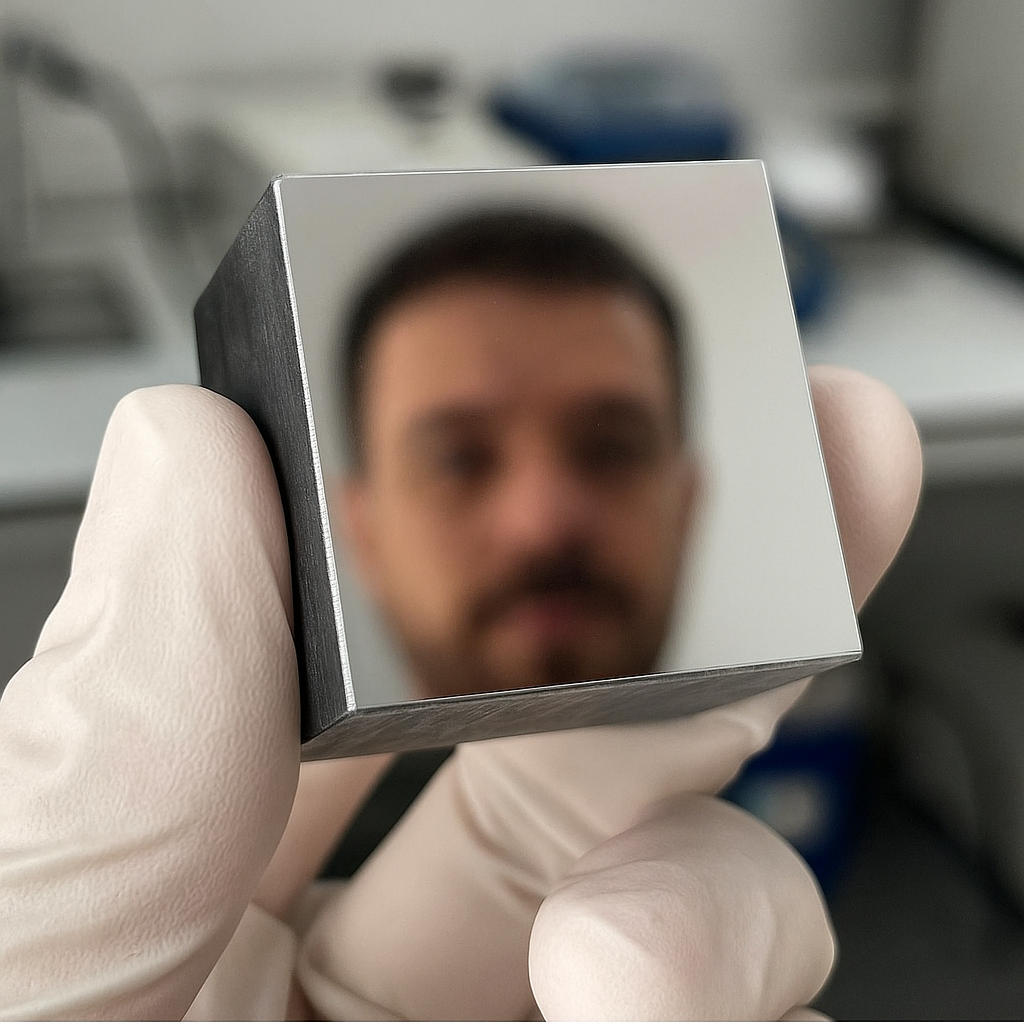
✅ Your final surface should be free of visible scratches, with a near-mirror finish and minimal topography.
✅ The surfaces must be not only shiny, but also mechanically undamaged—polishing quality directly impacts indexing success.
🧪 Final Polishing with Colloidal Silica (OPS)
After completing polishing with 0.25 μm diamond suspension, the final step is polishing with colloidal silica (OPS). This stage significantly improves surface quality for optical microscopy and EBSD by removing residual fine scratches and surface deformation.
⚙️ OPS Suspension & Setup
- OPS is typically used in a diluted form, prepared at a 1:4 ratio (1 part OPS : 4 parts distilled water). This dilution helps control viscosity and prevents agglomeration.
- Use a dedicated polishing cloth, such as OP-Chem or MD-Chem. These cloths are also designed to retain moisture evenly, which is crucial because OPS tends to dry and agglomerate if water supply is insufficient. A dried OPS surface can leave streaks or redeposit particles on the sample.
- Make sure the cloth stays consistently moist throughout the procedure.
- 👉 A few drops of distilled water applied periodically will maintain lubrication and prevent the suspension from drying out and clumping.
- Keep the rotation speed low, similar to the earlier polishing steps, to minimize heating and allow uniform surface interaction.
🌀 Process and Duration
- Place the sample gently on the cloth and rotate it in the opposite direction to the cloth movement.
- Apply very light pressure—OPS is designed to chemically interact with the surface and does not require aggressive polishing.
- The polishing time can be extended to enhance surface smoothness.
- 🕒 Polishing for 20–40 minutes is typical for high-quality EBSD preparation. In some cases, durations of up to 45 minutes may be used depending on sample response and prior polishing quality.
🔬 Chemical-Mechanical Action
OPS polishing provides dual benefits:
- Mechanical abrasion by ~50 nm silica particles
- Chemical action, particularly effective on aluminium, that removes the final deformation layer and fine scratches left by 0.25 μm diamond polish.
✅ This results in a stress-relieved, mirror-like surface with minimal topography.
🧼 Final Cleaning & Drying
After OPS polishing, thorough cleaning is critical to remove any remaining slurry and prevent crystallized residues.
- Place the sample in an ultrasonic ethanol bath for 20–25 minutes.
- Use clean ethanol to ensure residue-free rinsing.
- Dry the sample with a nitrogen gun or air duster—never with direct lab air (see GATA 1!).
- Don’t forget to clean your OPS cloth after use to avoid silica buildup.
💡 Tip: Inspect the final surface under optical microscopy or SEM at low magnification. There should be no directional scratches, no relief, and no contamination particles. The surface should appear like a perfect mirror.
✅ At this stage, your AA6082 aluminium sample is fully prepared for EBSD acquisition.