Over the years, I’ve learned that good science isn’t just about great equipment or perfect protocols—it’s also about tiny habits that prevent big mistakes. These aren’t the things you’ll typically find in textbooks, but they often make the difference between clean results and total chaos.
And yes, every one of these habits comes from real-life mistakes—including mine 😊.
So here’s a list of practical, experience-driven lab tips—what I like to call “GATAs”—that will help you stay organized, protect your samples, and maintain your sanity along the way.
✅ GATA 1: Don’t Use Air Blow — Ever
Even in labs with filtered air systems, blowing compressed air directly onto sensitive samples is a risky practice. Compressed air can carry microscopic particles, oil vapors, or moisture, all of which can compromise surface integrity, especially when dealing with corrosion-sensitive materials like biodegradable magnesium alloys.
👉 Instead, use a clean air spray bottle or dry nitrogen gun to gently remove residual fluids.
💡 I learned this the hard way. Below is an image of an AZ31 magnesium alloy sample after immersion in phosphate-buffered saline (PBS). Its cross-section was carefully prepared by grinding and polishing. However, during the final step, after ultrasonic cleaning in ethanol, the sample was dried using standard lab air. The result? Numerous undefined dark patches appeared on the surface. These artefacts likely resulted from contaminants or residual moisture introduced during the air blow.
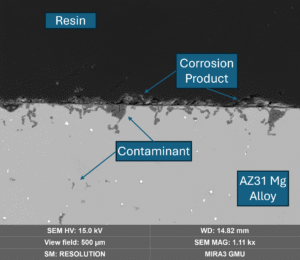
Let me emphasize: imagine you’ve spent 30 minutes meticulously polishing a single cross-section for SEM analysis. You’ve finished ultrasonic cleaning in ethanol, everything looks perfect. Then, for convenience, you dry the sample with a quick lab air jet. That 5-second shortcut can undo all your effort.
For biodegradable metals, where surface integrity is critical, drying must be handled with as much care as preparation itself. Trust me—avoid the air gun.
✅ GATA 2: Hang Your Sample During Cleaning and Drying
After corrosion testing in a physiological solution, proper cleaning and drying are critical. At this stage, the sample’s surface is highly reactive and prone to artefact formation. You must avoid exposing it to water again—even for rinsing—as this could introduce uncontrolled post-test corrosion.
Following immersion, samples are typically cleaned in ultrasonic ethanol baths to remove loosely adhered corrosion products. But one often overlooked detail is how you dry the sample.
❌ Don’t lay the specimen flat on tissue or glassware surfaces. Doing so can trap ethanol droplets, lead to capillary stains, or create asymmetric residue patterns—especially on polished or cross-sectional surfaces.
👉 Instead, suspend the sample vertically during both cleaning and drying. Use non-metallic tweezers, thread, or plastic clips to hang the specimen without contacting the surface.
💡 Drying upright allows solvents like ethanol to drain uniformly by gravity, minimizing drying marks, streaks, or redeposition of corrosion byproducts. It’s a simple trick—but one that can preserve the integrity of your analysis.

📌 Remember: at this stage, every surface detail matters. Don’t let drying errors distort your SEM or optical results.
✅ GATA 3: Take a Quick Photo After Each Cleaning Step
📌 If you’re performing a surface-altering process, such as corrosion, coating, or etching, it’s best practice to take before and after images. This allows you to visualize material transformations and provides strong supporting evidence for publications or discussions.
After completing any surface preparation—be it polishing, etching, or cleaning—take a moment to document the result with a quick photo, even with your phone.
👉 These simple snapshots are invaluable for tracking surface changes, catching defects early, and serving as visual references in future analysis.
💡 I used to only rely on optical microscope images, but over time I realized that many surface features, especially subtle artefacts, appear unexpectedly and are hard to describe in words. A photo captures them instantly.

🧠 Plus, photos act as a safety net: when you forget to note something in your lab book, you can often reconstruct the sequence using timestamped image files.
📸 Take photos. Tag them clearly. Revisit them when needed.
It’s one of the most reliable habits for quality control, team communication, and publication-ready documentation.
✅ GATA 4: Photograph Your Procedures, Not Just Results
We all tend to focus on documenting the final outcome, clean microstructures, corrosion maps, or fracture surfaces. But in research, the process is just as important as the result.
👉 Make it a habit to photograph key steps during sample preparation and testing: grinding, drying setups, immersion conditions, etching procedures, drying methods, etc.
💡 These process images can be critical for troubleshooting, reproducibility, and training others.
Your future self, and especially your collaborators and students, will thank you when they’re trying to replicate your methods or understand your workflow months later.

📌 Visual records of procedures often become valuable figures in presentations, thesis appendices, and even publications. You don’t need a DSLR—clarity and context are more important than resolution.
✅ GATA 5: Use a Dedicated Sample Folder—And Back It Up
Organized record-keeping can make or break a research project. Create a dedicated physical folder or notebook for each project or sample batch. A simple blue plastic A4 folder or a well-labeled lab notebook works perfectly. In it, document everything: polishing steps, solution compositions, test conditions, unexpected observations—anything that may be hard to recall later.
👉 Keep it close to your working area, but also back it up digitally whenever possible. Snap photos of important pages or transcribe notes into a cloud-based system.
💡 Paper gets damaged, lost, or borrowed—sometimes permanently. Don’t rely on it as your only record.

Let me share a personal lesson: when I first started working at the University of Portsmouth, I was given a handful of identical small notebooks. I wasn’t a very disciplined note-taker at the time, so I didn’t assign each notebook to a specific project. Over time, I began using whichever notebook was nearby, forgetting which one belonged to which task. Eventually, I ended up with five nearly identical notebooks, all containing scattered information from different parts of multiple projects.
📌 The result? Confusion, delays, and lots of time wasted flipping through pages trying to reconstruct what happened when. Don’t do that.
Establish a system early. Label your folders and notebooks clearly. Assign one per project or major sample batch. You’ll thank yourself later—especially during paper writing or data review.
✅ GATA 6: Label Samples and Solutions Logically—and Stick to It
Few things derail a study faster than unclear, inconsistent, or cryptic labeling.
👉 Use a systematic and consistent naming structure, for example:MG2025_S01_Imm1 → Magnesium alloy, year 2025, sample 01, first immersion test.
💡 At first, your labels will feel intuitive, but after a few months (and dozens of samples), even the best memory fades. That’s why it’s essential to create and maintain a reference table, preferably on the first page of your lab notebook or digital log, defining what each code means.
🎯 And remember: your labels aren’t just for you. When you’re explaining your project to a colleague, supervisor, or student, don’t expect them to decipher a piece of cryptic shorthand like TestB-123-RS. What made sense to you during the experiment might sound like encrypted code to others six months later.
📌 Good labeling is like good science: reproducible, transparent, and sharable.
Develop a system early, document it well, and stick to it. Your future self and your research group will appreciate it.
✅ GATA 7: Good Science Needs Real Budgets
In research, trying to save on essentials like quality buffers, imaging time, or reliable sample holders often leads to bigger losses down the line. What seems cost-effective at first can compromise data quality or force repeat experiments.
👉 Plan ahead. Apply for funding. And don’t hesitate to ask for what your project genuinely needs.
💡 Even a low-cost setup can produce high-impact results, but only when the fundamentals are solid and supported.
At Innovative Materials Mechanics (IMM), we believe in this principle. That’s why we’re open to collaborations that are built on strong methodology, realistic budgets, and shared scientific ambition.
📬 If you’re working on advanced materials and looking to collaborate on high-quality, well-supported research, we’d be happy to connect.
Let’s combine resources, share expertise, and make great science happen—together